
12345678901234567890123456789012345678901234567890123456789012345678901234567890123456789012345678901234567890 http://indiewebcamp.com/
Test tweet to see if the URL will be shortened by …
Test tweet to see if the URL will be shortened by Social. My source for learning about the IndyWeb: #indieweb http://indiewebcamp.com/
My new website theme: http://crowdfavorite.com/fa…
My new website theme: http://crowdfavorite.com/favepersonal/
Making a test to see if this appears on my Twitter…
Making a test to see if this appears on my Twitter account….
Adding hCard information to my About page
I am starting to add some IndieWeb features to my WordPress website. To start, I used the hCard creator page to create hCard markup, then added it to my About page with the Text tab selected in the editor – easy!
Now to figure out my next step…
My Google Chrome app book is now available!
I have recently completed a new book titled “Building Browser Apps with Google Chrome”. The book focuses on how to develop packaged apps, one of several types of applications that can be used by the Google Chrome browser. For more information, see the book announcement post, or go ahead and checkout the HTML version of the book (it’s free!).
Sort Your Data Using Javascript
Introduction
Javascript has basic sorting built into the language, but it also has the flexibility to do any kind of sorting you want. Read on and find out more about how you can customize your sorting tasks with Javascript.
Basic sorting
The Javascript array sort method performs an alphabetic sort of an array. Here are some examples:
[cc lang=”javascript”]
var wordList = new Array( “red”, “green”, “blue”);
wordList.sort();
[/cc]
Printing wordList gives the list {“blue, “green”, “red”} (see Example 1 web page).
[cc lang=”javascript”]
var wordList2 = new Array(“tiger”, “cat”, “dog”);
wordList2.sort();
[/cc]
Printing wordList2 gives the list “cat”, “dog”, “tiger” (see Example 2 web page).
Sorting using comparison functions
To perform sorting of an array using some other method besides alphabetical sorting, a comparison function must be passed to the sort method. This function can be included in the sort method as an unnamed function, or it can be a separate named function which can be called by the sort method. Here is an example of a template for a separate function:
[cc lang=”javascript”]
function numberTest (a, b) {
}
var numberList = {5, 4444, 333, 22222, 11};
numberList.sort(numberTest);
[/cc]
The sort method calls the function numberTest, working through all of the elements in the array. The arguments a and b in the function represent two elements in the array. The body of the function should return one of three values:
1. a goes before b = return a negative number
2. a goes after b = return a positive number
3. a is the same as b = return a zero
A simple comparison function for a numeric sort would be:
[cc lang=”javascript”]
function numberTest (a, b) {
return a – b;
}
[/cc]
This function will perform a numeric sort in increasing order. Printing the numberList array after sorting will display the following:
5 11 333 4444 22222 (see Example 3 web page).
To perform a numeric sort in decreasing order, the line within the function should be changed to the following:
[cc lang=”javascript”]
return b – a;
[/cc]
Printing the numberList array after sorting will display the following:
22222 4444 3333 11 5 (see Example 4 web page).
To perform a reverse alphabetic sort, the comparison function must explicitly return a -1, 0, or 1 depending on the alphabetic order. Returning the value of the direct comparison as for numeric sorting will not work. An example comparison function is shown below:
[cc lang=”javascript”]
function reverseAlphabeticTest(a, b) {
if (a < b) return 1;
if (a > b) return -1;
return 0;
}
[/cc]
(see Example 5 web page).
Sorting lists of objects
Next, let us examine sorting an array of objects, where each object has two fields. A set of objects could be as follows:
[cc lang=”javascript”]
var testObject1 = {item: 5, note: “aaa”};
var testObject2 = {item: 4, note: “bbb”};
var testObject3 = {item: 3, note: “ccc”};
var testObject4 = {item: 2, note: “ddd”};
var testObject5 = {item: 1, note: “eee”};
[/cc]
These object can then be added to an array as follows:
[cc lang=”javascript”]
var testArray = new Array(); // Create a test array
// Add objects to testArray
testArray[testArray.length] = testObject1;
testArray[testArray.length] = testObject2;
testArray[testArray.length] = testObject3;
testArray[testArray.length] = testObject4;
testArray[testArray.length] = testObject5;
[/cc]
where the length property of the array is used as the index (it increases as more objects are added to the array).
The numeric sort comparison function used for examples 3 and 4 can be reused for sorting on any field in the object, but the field must be specified using a dot structure as shown below:
[cc lang=”javascript”]
function compareItems (a, b) {
return a.item – b.item;
}
testArray.sort(compareItems);
[/cc]
Printing the list of items and notes in the array after sorting gives the following:
Items: 1 2 3 4 5
Notes: eee ddd ccc bbb aaa
(see Example 6 web page).
As shown before, the order can be reversed by reversing the order of the elements in the comparison function.
Finally, let us look at how a comparison function can be more complex. This example will assume that Javascript is being used to read RSS feeds using the XMLHttpRequest function, and that the news items in the RSS feed need to be sorted by the pubDate element for use in a “River of News” RSS reader application. The application has already extracted the news items from RSS feeds as individual objects in an array with the following fields for each RSS item: title, link, description, pubDate, and guid. An example object could be as follows:
[cc lang=”javascript”]
var testObject1 = {title: “Star City”,
link: “http://liftoff.msfc.nasa.gov/news/2003/news-starcity.asp”,
description: “How do Americans get ready to work with Russians aboard the space station?”,
pubDate: “Tue, 03 Jun 2003 09:39:21 GMT”,
guid: “http://liftoff.msfc.nasa.gov/2003/06/03.html#item573”};
[/cc]
To perform a sort on pubDate, the text string describing the publication date of the item needs to be converted to a number for comparison. We can use the parse method included with the Javascript Date object to create the following comparison function:
[cc lang=”javascript”]
function comparepubDates(a, b) {
var pubDateValue1 = Date.parse(a.pubDate); // Get milliseconds for date/time string
var pubDateValue2 = Date.parse(b.pubDate); // Get milliseconds for date/time string
return pubDateValue1 – pubDateValue2;
}
[/cc]
This function will parse the pubDate field and convert the date string to a value in milliseconds, then use that value for the comparison to sort the objects.
(see Example 7 web page).
Summary
Javascript can sort arrays of data and arrays of objects in flexible ways. Use these examples to start sorting your data today!
References
RSS specification – hosted at Harvard University
Stack Overflow – discussion on sorting of Javascript objects
Getting started with Javascript
When I start to learn a new language or framework, creating a small application really helps accelerate the learning process. Using the work I did for a MacTech article on test-driven development, I created a simple number guessing game as a Javascript web application (game page is here). I also used the YUI 2 YUITest testing framework to check out my Javascript functions as I developed them (test page is here). My next steps with this will be to try creating some browser extensions using this game as a starting point.
Developing OPML Editor Tools – Part 7
Part 7 – Conclusion
This series has provided an introduction to developing Tools for the OPML Editor. However, the topics covered in this series have not even scratched the surface of the capabilities within the OPML Editor. Dave Winer has compiled a list of resources on the OPML Editor HowTo web site, but here are some additional pointers and guidance for learning the OPML Editor development environment:
- Frontier.userland.com – Frontier is the kernal application behind the OPML Editor. The user guide provides a good overview of the capabilities of Frontier.
- Docserver.userland.com – An overview of all keywords and commands available for the OPML editor programming language, UserTalk.
- Matt Neuberg’s Things Having To Do with Userland Frontier – Matt Neuberg is probably the leading expert on Frontier outside of UserLand Software and Dave Winer. This page provides links to tutorials on scripting and building web sites, as well as a full text version of his Frontier book. A review of these resources would benefit any OPML Editor developer.
- Radio UserLand Resource Directory – Although somewhat dated, this directory contains some good pointers to other information on the Frontier development environment, which supports the Radio UserLand application from UserLand Software.
I hope this series will “whet your appetite” to explore the power and possibilities of the OPML Editor. Feel free to leave comments on these weblog posts if you have questions or problems, or consult the About page for contact information. Good luck!
Series Table of Contents:
Developing OPML Editor Tools – Part 6
Part 6 – Creating an application – Windows Updates
As mentioned in the previous part of this series, some additional applications and Tool changes are required to support calling the Delicious API for Windows users. The following steps were followed on a ASUS EeePC 1000HD running Windows XP.
Step 1 – cURL installation and setup
Download a Windows version of cURL with SSL support. You can use the Download Wizard or pick one of the Win32 – Generic versions with SSL (this version was used in development of this tutorial). Once you have downloaded a version, unzip the file and copy the curl.exe file to a directory for use. In testing of this tutorial, curl.exe was copied to C:\bin. Next, the path C:\bin was added to the PATH environment variable. To do this, perform the following steps:
- Click Start, then double-click on Control Panel, then double-click on System (opens System Properties window)
- Click on Advanced tab, then click on Environment Variables button (opens Environment Variables window)
- In System variables area of window, scroll down and click on the Path variable entry, then click on the Edit button (opens Edit System Variable window)
- Click in the Variable value text box, press the End button to move the cursor to the end of the field, then enter ;C:\bin
- Click OK (closes Edit System Variable window)
- Click OK (closes Environment Variables window)
- Click OK (closes System Properties window)
- You may have to perform a restart of the PC for the change to take effect.
Step 2 – Other SSL support installation and setup
As mentioned at the bottom of the cURL download page, the OpenSSL binaries/DLLs are required for the cURL versions with SSL support. The OpenSSL binary and Visual C++ Executables from Shining Light Software should be installed (the versions installed for this series were Win32OpenSSL_Light-0_9_8k.exe and vcredits_x86.exe). Next, copy cacert.pem from C:\Program Files\OpenSSL\bin to C:\bin where the cURL executable file was copied, and then copy cacert.pem to curl-ca-bundle.crt in that directory. The Windows version of cURL will automatically look for a CA certs file named ‘curl-ca-bundle.crt’, either in the same directory as curl.exe, or in the Current Working Directory, or in any folder along your PATH. This is why cacert.pem needs to be copied and renamed as curl-ca-bundle.crt (see this reference for more information). As mentioned in step 1 above, a restart of the PC may be required.
Step 3 – Windows updates for MyDeliciousTool
After installing the cURL and SSL tools, the MyDeliciousTool Tool needs some modifications to be able to call the Delicious API using cURL. The Windows version of the OPML Editor supports the Windows Component Object Model (COM) interface. The curlDelicious script from part 5 will be modified to call cURL using a COM command shell object. In the Macintosh version of the MyDeliciousTool, the OPML Editor was able to receive the response from the cURL application and assign it directly to a string. In the Windows version, the output from cURL will be written to a file. The contents of the file will then be read and assigned to the string.
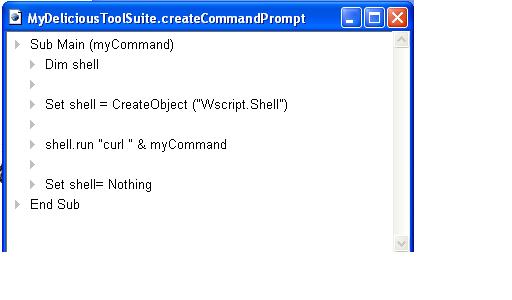
To be able to create the COM command shell object, a Visual Basic script will be used. This will be created using the outline object type. From the Window menu, select the “MyDeliciousTool.root” menu item. Next, press the Control key and double-click on the black triangle next to the MyDeliciousToolSuite entry in the table. A new window will open with the MyDeliciousToolSuite table. Click in the table, then go to the Table menu and select the New Outline menu item. A dialog box will appear asking for the name of the new outline. Type the name “createCommandPrompt” without quotes and click OK. A new window will open that looks similar to a script. Enter the following text into the outline:
Sub Main (myCommand)
   Dim shell

   Set shell = CreateObject ("Wscript.Shell")

   shell.run "curl " & myCommand

   Set shell = Nothing
End Sub
The script should appear as follows:
Next, update the curlDelicious script in the MyDeliciousToolSuite table as follows:
on curlDelicious ()
   local (s, s1, curlCommand)
   local (scriptCode = string (MyDeliciousToolSuite.createCommandPrompt))
   new (tableType, @MyDeliciousToolData.userdata.apiResponseCompile)
   s = "-o C:\test.txt https://" + MyDeliciousToolData.userdata.username + ":"
   s = s + MyDeliciousToolData.userdata.password
   s = s + "@api.del.icio.us/v1/posts/recent?count="
   s = s + MyDeliciousToolData.userdata.bookmarks
   result = com.callScript (scriptCode, "VBScript", "Main", {s})
   s1 = file.readWholeFile("C:\test.txt")
   wp.newTextObject (s1, @MyDeliciousToolData.userdata.apiResponse)
   xml.compile (s1, @MyDeliciousToolData.userdata.apiResponseCompile)
The rest of the logic from part 5 of this series remains the same.
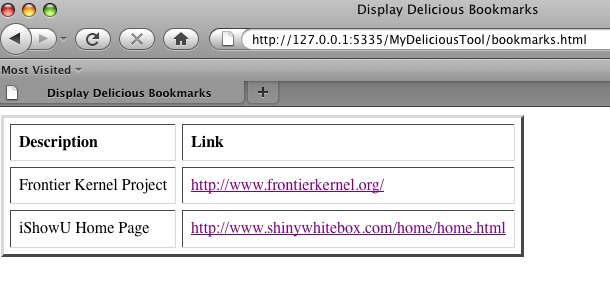
To view Delicious bookmarks, make sure that you have entered the username and password for your Delicious account and that you have set the number of bookmarks to retrieve (it must be less than 100). Go to the main page of the application (http://127.0.0.1:5335/MyDeliciousTool/) and click on the Get Bookmarks link. Within a few seconds you should see a display of the bookmarks you have retrieved. Here is the bookmark display from the example XML shown in part 5 of this series:
Further reading
The following links go into more detail on this part of this series.
- COM Client – Describes COM client support built into Frontier, which is the kernal of the OPML Editor.
Series Table of Contents: