Experimenting with the Social plugin for WordPress

When I installed the FavePersonal theme for my weblog, it included the Social plugin for WordPress. I did some experiments with the Twitter broadcast mode, making posts using the Status tab in the editor.

EditPost


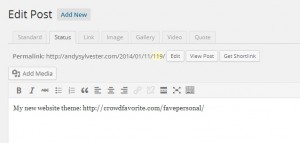
I entered text and a URL at the end, but my weblog did not display the link as active:

Post01


The link did appear active in Twitter, though:

Tweet01


Next, I entered text and a link again, and this one did display the link on the weblog:

Post02


I think that the problem was that there was a colon before the link in the first example, I will have to perform some more tests for that problem.

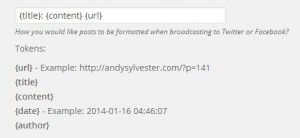
I also decided to change the template for the tweet. Here is how the initial default setting appears in the Social settings page:

Social01


The format is:

{title}: {content} {url}

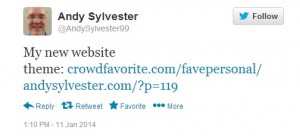
This resulted in this tweet:

Tweet01

I decided to remove the URL field so that it now looks like:

{title}: {content}

This resulted in this tweet:

Tweet02

I started adding more than 140 characters to see if the Social plugin would shorten the URL at the end of the post, but it did not perform any shortening. If I want to shorten URLs in a post, it looks like I will need to find a URL shortener plugin or use a service like Bitly.

Overall, the Social plugin meets my needs (I don’t have a Facebook account, so I don’t know how well that part works). I will probably try other plugins like Jetpack to see how they work.


Setting up WordPress on WAMPServer

After getting the web server part of WampServer working, I wanted to install the latest version of WordPress (version 3.8) and the FavePersonal theme by Alex King. I wanted to play with it before installing it on my regular website. I decided to search for some examples on installing WordPress on WampServer. The best one was on WPBeginner.com, but I still had to get some other information to complete the installation. When the post talked about using phpmyadmin to set up a MySQL database for the WordPress install, it did not mention at that point that the default username and password for phpmyadmin would be root and blank. I had to enter that information to be able to create the database for WordPress. The post did mention it later when talking about setting up the wp-config.php file.

When I reached the point where the WordPress application displayed a screen prompting me to create a configuration file, I went ahead and clicked on the “Create A Configuration File” button. The next screen appeared as shown in the post. I entered the information for the database name, username and password, and entered “localhost” for the database host. However, when I clicked the Submit button, the browser appeared to not be able to connect to the server. As I mentioned in an earlier post, I had to use “http://localhost:8080” for my WampServer install. I then entered localhost:8080 as the host name, but this was not successful, either. I finally decided to go ahead and create a configuration file by saving a copy of wp-config-sample.php as wp-config.php in the root directory of my WordPress directory (C:\wamp\www\mytestweblog for my install). Here are my entries:

[cc lang=”perl”]

// ** MySQL settings – You can get this info from your web host ** //
/** The name of the database for WordPress */
define(‘DB_NAME’, ‘mytestwp_db’);

/** MySQL database username */
define(‘DB_USER’, ‘root’);

/** MySQL database password */
define(‘DB_PASSWORD’, ”);

/** MySQL hostname */
define(‘DB_HOST’, ‘localhost’);

[/cc]

After creating that file, I again went to http://localhost:8080/mytestweblog/, and was able to resume setup of my weblog per the post. I played around with the test weblog, and liked it enough to put it on my main weblog.

For WampServer installs where port 8080 has to be used, it seems that WordPress has problems with creating a configuration file. The user will probably need to create the file manually.
 

Correcting WAMPServer Apache problems

A long time ago, I had the WAMPServer application set up on a netbook and did some WordPress work on that setup. Since then, I have moved on to a full laptop, but had not used WAMPServer on that machine. I wanted a place to explore some different WordPress themes separate from my regular install, so I started on the WAMP install process.

I downloaded the current version at the time and clicked through the install steps, which were pretty straightforward. However, when I started WAMPServer and tried to enter “localhost” in the browser, I did not see the default PHP index page. After some searching in the WAMPServer forums, I found that if Skype is installed, that can tie up port 80. I tried unchecking the box for port 80 in Skype options in my installation, but still did not see anything when I entered localhost in the browser. Finally, per this Wampserver forum post, I saw that it should be possible to change the Apache port to port 8080 instead of 80. I edited httpd.conf (at C:\wamp\bin\apache\Apache2.4.4\conf in my install) and changed the port listening to 8080 as follows:

[cc lang=”perl”]
#
# Listen: Allows you to bind Apache to specific IP addresses and/or
# ports, instead of the default. See also the <VirtualHost>
# directive.
#
# Change this to Listen on specific IP addresses as shown below to
# prevent Apache from glomming onto all bound IP addresses.
#
#Listen 12.34.56.78:80
Listen 8080
[/cc]

After that, http://localhost:8080 worked! The WAMPServer documentation should be updated to make it easier to correct this problem.

Rebooting My Weblog

I started my weblog a few years ago, and have done some writing here and for publication. However, I have let things slide, and have not been active in quite a while. In the past few months, I have become interested in the IndieWeb concept of publishing your content once and syndicating elsewhere (POSSE). I am also interested in doing some mobile development and finally have some time to explore both of these areas. With this being the first part of the year, I thought I would put my stake in the ground as to what my weblog focus will be:

Out of the Box – These types of posts will be to capture the first experience of using a tool, app, or technique. My hope is to capture the good, the bad, and the ugly, and provide feedback on the bad and ugly parts.

Narrate Your Work – Following Dave Winer’s post, I am going to work to document my steps as I try out new tools and apps.

I am also going to take heart in Matt Mullenweg’s post for the New Year where he talks about the intrinsic value of blogging, and write this weblog for myself and one other person (I will have to figure our who that person is!). Now, let’s get started!