Part 6 – Creating an application – Windows Updates
As mentioned in the previous part of this series, some additional applications and Tool changes are required to support calling the Delicious API for Windows users. The following steps were followed on a ASUS EeePC 1000HD running Windows XP.
Step 1 – cURL installation and setup
Download a Windows version of cURL with SSL support. You can use the Download Wizard or pick one of the Win32 – Generic versions with SSL (this version was used in development of this tutorial). Once you have downloaded a version, unzip the file and copy the curl.exe file to a directory for use. In testing of this tutorial, curl.exe was copied to C:\bin. Next, the path C:\bin was added to the PATH environment variable. To do this, perform the following steps:
- Click Start, then double-click on Control Panel, then double-click on System (opens System Properties window)
- Click on Advanced tab, then click on Environment Variables button (opens Environment Variables window)
- In System variables area of window, scroll down and click on the Path variable entry, then click on the Edit button (opens Edit System Variable window)
- Click in the Variable value text box, press the End button to move the cursor to the end of the field, then enter ;C:\bin
- Click OK (closes Edit System Variable window)
- Click OK (closes Environment Variables window)
- Click OK (closes System Properties window)
- You may have to perform a restart of the PC for the change to take effect.
Step 2 – Other SSL support installation and setup
As mentioned at the bottom of the cURL download page, the OpenSSL binaries/DLLs are required for the cURL versions with SSL support. The OpenSSL binary and Visual C++ Executables from Shining Light Software should be installed (the versions installed for this series were Win32OpenSSL_Light-0_9_8k.exe and vcredits_x86.exe). Next, copy cacert.pem from C:\Program Files\OpenSSL\bin to C:\bin where the cURL executable file was copied, and then copy cacert.pem to curl-ca-bundle.crt in that directory. The Windows version of cURL will automatically look for a CA certs file named ‘curl-ca-bundle.crt’, either in the same directory as curl.exe, or in the Current Working Directory, or in any folder along your PATH. This is why cacert.pem needs to be copied and renamed as curl-ca-bundle.crt (see this reference for more information). As mentioned in step 1 above, a restart of the PC may be required.
Step 3 – Windows updates for MyDeliciousTool
After installing the cURL and SSL tools, the MyDeliciousTool Tool needs some modifications to be able to call the Delicious API using cURL. The Windows version of the OPML Editor supports the Windows Component Object Model (COM) interface. The curlDelicious script from part 5 will be modified to call cURL using a COM command shell object. In the Macintosh version of the MyDeliciousTool, the OPML Editor was able to receive the response from the cURL application and assign it directly to a string. In the Windows version, the output from cURL will be written to a file. The contents of the file will then be read and assigned to the string.
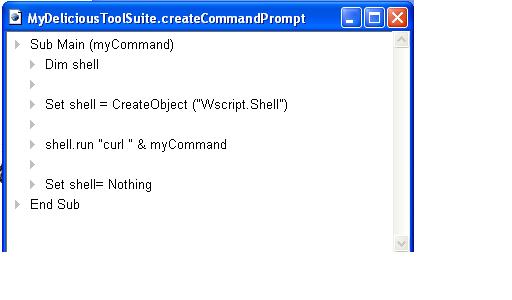
To be able to create the COM command shell object, a Visual Basic script will be used. This will be created using the outline object type. From the Window menu, select the “MyDeliciousTool.root” menu item. Next, press the Control key and double-click on the black triangle next to the MyDeliciousToolSuite entry in the table. A new window will open with the MyDeliciousToolSuite table. Click in the table, then go to the Table menu and select the New Outline menu item. A dialog box will appear asking for the name of the new outline. Type the name “createCommandPrompt” without quotes and click OK. A new window will open that looks similar to a script. Enter the following text into the outline:
Sub Main (myCommand)
   Dim shell

   Set shell = CreateObject ("Wscript.Shell")

   shell.run "curl " & myCommand

   Set shell = Nothing
End Sub
The script should appear as follows:
Next, update the curlDelicious script in the MyDeliciousToolSuite table as follows:
on curlDelicious ()
   local (s, s1, curlCommand)
   local (scriptCode = string (MyDeliciousToolSuite.createCommandPrompt))
   new (tableType, @MyDeliciousToolData.userdata.apiResponseCompile)
   s = "-o C:\test.txt https://" + MyDeliciousToolData.userdata.username + ":"
   s = s + MyDeliciousToolData.userdata.password
   s = s + "@api.del.icio.us/v1/posts/recent?count="
   s = s + MyDeliciousToolData.userdata.bookmarks
   result = com.callScript (scriptCode, "VBScript", "Main", {s})
   s1 = file.readWholeFile("C:\test.txt")
   wp.newTextObject (s1, @MyDeliciousToolData.userdata.apiResponse)
   xml.compile (s1, @MyDeliciousToolData.userdata.apiResponseCompile)
The rest of the logic from part 5 of this series remains the same.
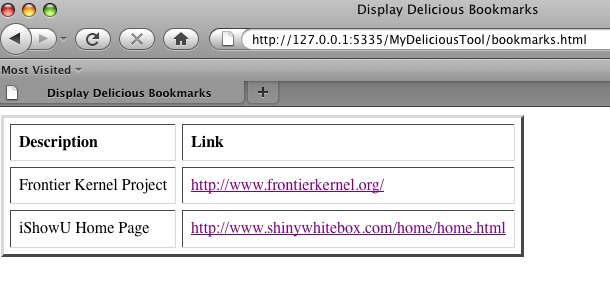
To view Delicious bookmarks, make sure that you have entered the username and password for your Delicious account and that you have set the number of bookmarks to retrieve (it must be less than 100). Go to the main page of the application (http://127.0.0.1:5335/MyDeliciousTool/) and click on the Get Bookmarks link. Within a few seconds you should see a display of the bookmarks you have retrieved. Here is the bookmark display from the example XML shown in part 5 of this series:
Further reading
The following links go into more detail on this part of this series.
- COM Client – Describes COM client support built into Frontier, which is the kernal of the OPML Editor.
Series Table of Contents: