Part 4 – Saving data in the tool database
The earlier parts of this series demonstrated how to create a Tool (mini-application) for the OPML Editor, how to create a web page display within the Tool, and how to use scripts to create content within web pages. This part of the series will show how to collect data entered into a web page and save it in the Tool database for later use. This example will show how to create a web page form asking for a username and password, how to save the form data in the Tool database, then extract the data from the Tool database for display.
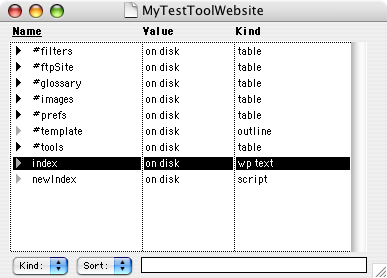
To begin, create a new wp text object in the MyTestToolWebsite table for the text of the web page form. To view the website table, go to the Window menu and select the “MyTestTool.root” menu option. If you have not created this Tool, go back to part 1 of this series and create the MyTestTool Tool. After the Tool is selected, a window will open showing a list of tables making up the Tool. Hold down the Apple or Control key and double-click on the black triangle next to the text “MyTestToolWebsite”. The following window will appear:
Click in the table, then go to the Table menu item and select the New Text item. A dialog box will appear asking for the name of the new wp text table entry. Enter the name “login” without quotes and click the OK button. A new window will appear as follows:
Enter the following text to create the form web page:
#title "Sign In"
<p>Please provide your username and password.</p>
<form method="post" action="confirm">
<p>
<INPUT TYPE=text NAME="username" SIZE=50>
</p>
<p>
<INPUT TYPE=text NAME="password" SIZE=50>
</p>

<TABLE BORDER="0" CELLPADDING="0" CELLSPACING="0" WIDTH="100" cols=2>
<TR ALIGN="CENTER">
<TD><INPUT TYPE="submit" VALUE="Submit"></TD>
<TD><INPUT TYPE="reset" VALUE="Reset"></TD>
</TR>
</TABLE>
</form>
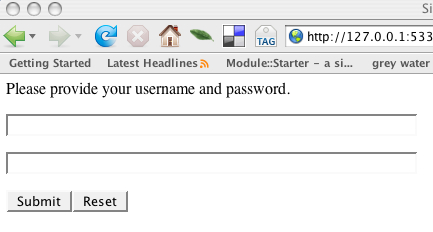
Close the window, then go to http://127.0.0.1:5335/MyTestTool/login in your browser. You should see the following web page:
Now that the web form has been created, how can the data in the form be accessed? When the OPML Editor web server serves a web page that contains a POST operation with arguments, those arguments are stored in a table that can be accessed via a script. In the HTML code given above, the action in the form code was “confirm”. When the web server within the OPML Editor receives the “Submit” button click, it will look for an entry in the website table with the name “confirm” and try to render the text and/or HTML code in that table entry. Part 3 in this series showed how a script could be executed to create a web page. That script will be used as a starting point to create a script to be called that can access the arguments from the HTML POST command.
In the MyTestTool.root window, click on the black triangle for the MyTestToolWebsite entry to select the table, then hold the Apple or Control key down and double-click on the triangle. This will open the MyTestToolWebsite table in a new window. Next, click on the newIndex entry in the table to select it, then go to the Edit menu and select Copy, then go back to the Edit menu and select Paste. A dialog box will appear saying “An item named newIndex already exists in this location”. Click on the “Duplicate” button to create a copy of the newIndex script, which will be called “newIndex #1”. To rename the entry, click on the name, which will highlight the name of the table entry, then type “confirm” without quotes.
Next, edit the script to read as follows:
local (pta = html.getpagetableaddress ())
pta^.title = "Confirmation Page"
pta^.flShowTitle = true //the page looks better with a title
return (MyTestToolSuite.ConfirmationScript ())
Now, a script named ConfirmationScript needs to be created. This script will get the arguments from the POST command (the username and password). Go to the MyTestToolSuite table, copy the TestScript entry, rename it as ConfirmationScript, and edit the script to appear as follows:
on ConfirmationScript ()
local (pta = html.getpagetableaddress ())
local (s1, s2)
new (tabletype, @pta^.searchArgTable)
webserver.parseargs (pta^.searchargs, @pta^.searchArgTable)
if pta^.method == "POST"
new (tabletype, @pta^.postArgs)
webserver.parseArgs (pta^.requestBody, @pta^.postArgs)
s1 = pta^.postArgs.username
s2 = pta^.postArgs.password
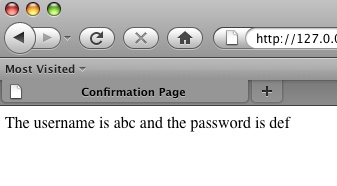
return ("The username is " + s1 + " and the password is " + s2)
This script gets the address where the OPML Editor web server is creating the web page for the confirm command, puts the POST argument data into a table called postArgs, assigns the values for the username and password to two strings, and returns a string with the data to be displayed in a web page.
Now go again to http://127.0.0.1:5335/MyTestTool/login in your browser. You should see the following web page:
Enter “abc” for the username and “def” for the password (without quotes). After clicking on the Submit button, the following should appear in the web browser:
The final step in this example is to save data from the POST command in the Tool database. To do this, we will add code to ConfirmationScript to create a subtable within the MyTestToolData table and store the POST arguments. Update the script as follows:
on ConfirmationScript ()
   local (pta = html.getpagetableaddress ())
   local (s1, s2)
   new (tabletype, @pta^.searchArgTable)
   new (tableType, @MyTestToolData.userdata)
   new (stringType, @MyTestToolData.userdata.username)
   new (stringType, @MyTestToolData.userdata.password)
   webserver.parseargs (pta^.searchargs, @pta^.searchArgTable)
   if pta^.method == "POST"
      new (tabletype, @pta^.postArgs)
      webserver.parseArgs (pta^.requestBody, @pta^.postArgs)
   s1 = pta^.postArgs.username
   s2 = pta^.postArgs.password
   MyTestToolData.userdata.username = s1
   MyTestToolData.userdata.password = s2
   return ("The username is " + MyTestToolData.userdata.username + " and the password is " + MyTestToolData.userdata.password)
Now go again to http://127.0.0.1:5335/MyTestTool/login in your browser. The following web page should appear:
The earlier parts of this series demonstrated how to create a Tool (mini-application) for the OPML Editor, how to create a web page display within the Tool, and how to use scripts to create content within web pages. This part of the series will show how to collect data entered into a web page and save it in the Tool database for later use. This example will show how to create a web page form asking for a username and password, how to save the form data in the Tool database, then extract the data from the Tool database for display.
To begin, create a new wp text object in the MyTestToolWebsite table for the text of the web page form. To view the website table, go to the Window menu and select the “MyTestTool.root” menu option. If you have not created this Tool, go back to part 1 of this series and create the MyTestTool Tool. After the Tool is selected, a window will open showing a list of tables making up the Tool. Hold down the Apple or Control key and double-click on the black triangle next to the text “MyTestToolWebsite”. The following window will appear:
Click in the table, then go to the Table menu item and select the New Text item. A dialog box will appear asking for the name of the new wp text table entry. Enter the name “login” without quotes and click the OK button. A new window will appear as follows:
Enter the following text to create the form web page:
#title "Sign In"
<p>Please provide your username and password.</p>
<form method="post" action="confirm">
<p>
<INPUT TYPE=text NAME="username" SIZE=50>
</p>
<p>
<INPUT TYPE=text NAME="password" SIZE=50>
</p>

<TABLE BORDER="0" CELLPADDING="0" CELLSPACING="0" WIDTH="100" cols=2>
<TR ALIGN="CENTER">
<TD><INPUT TYPE="submit" VALUE="Submit"></TD>
<TD><INPUT TYPE="reset" VALUE="Reset"></TD>
</TR>
</TABLE>
</form>
Close the window, then go to http://127.0.0.1:5335/MyTestTool/login in your browser. You should see the following web page:
Now that the web form has been created, how can the data in the form be accessed? When the OPML Editor web server serves a web page that contains a POST operation with arguments, those arguments are stored in a table that can be accessed via a script. In the HTML code given above, the action in the form code was “confirm”. When the web server within the OPML Editor receives the “Submit” button click, it will look for an entry in the website table with the name “confirm” and try to render the text and/or HTML code in that table entry. Part 3 in this series showed how a script could be executed to create a web page. That script will be used as a starting point to create a script to be called that can access the arguments from the HTML POST command.
In the MyTestTool.root window, click on the black triangle for the MyTestToolWebsite entry to select the table, then hold the Apple or Control key down and double-click on the triangle. This will open the MyTestToolWebsite table in a new window. Next, click on the newIndex entry in the table to select it, then go to the Edit menu and select Copy, then go back to the Edit menu and select Paste. A dialog box will appear saying “An item named newIndex already exists in this location”. Click on the “Duplicate” button to create a copy of the newIndex script, which will be called “newIndex #1”. To rename the entry, click on the name, which will highlight the name of the table entry, then type “confirm” without quotes.
Next, edit the script to read as follows:
local (pta = html.getpagetableaddress ())
pta^.title = "Confirmation Page"
pta^.flShowTitle = true //the page looks better with a title
return (MyTestToolSuite.ConfirmationScript ())
Now, a script named ConfirmationScript needs to be created. This script will get the arguments from the POST command (the username and password). Go to the MyTestToolSuite table, copy the TestScript entry, rename it as ConfirmationScript, and edit the script to appear as follows:
on ConfirmationScript ()
   local (pta = html.getpagetableaddress ())
   local (s1, s2)
   new (tabletype, @pta^.searchArgTable)
   webserver.parseargs (pta^.searchargs, @pta^.searchArgTable)
   if pta^.method == "POST"
      new (tabletype, @pta^.postArgs)
      webserver.parseArgs (pta^.requestBody, @pta^.postArgs)
   s1 = pta^.postArgs.username
   s2 = pta^.postArgs.password
   return ("The username is " + s1 + " and the password is " + s2)
This script gets the address where the OPML Editor web server is creating the web page for the confirm command, puts the POST argument data into a table called postArgs, assigns the values for the username and password to two strings, and returns a string with the data to be displayed in a web page.
Now go again to http://127.0.0.1:5335/MyTestTool/login in your browser. You should see the following web page:
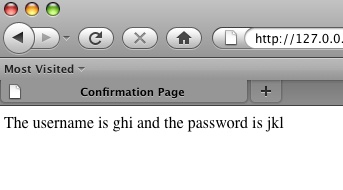
Enter “ghi” for the username and “jkl” for the password (without quotes). When you click on the Submit button, you should see the following appear in your web browser:
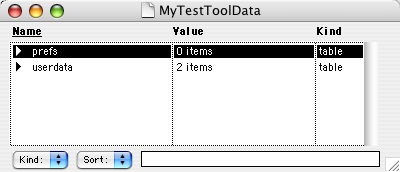
To check the entries in the Tool database, go to the Window menu and select the MyTestTool.root menu item, click on the MyTestTool window, then press the Apple or Control key and double-click on the triangle next to the MyTestToolData table entry. A new window will open as follows:
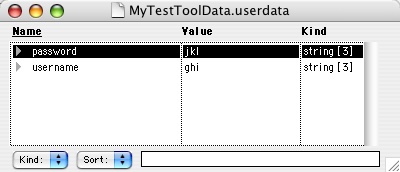
Finally, press the Apple or Control key and double-click on the triangle next to the userdata entry. A new window showing the data elements will open as follows:
The first four parts of this series covered running scripts in the OPML Editor, creating a user interface, and storage and retrieval of data within a Tool. The final part of this series will develop an example application with the OPML Editor to interact with the Delicious social bookmarking service.
Further Reading
The following links go into more detail on parts of this tutorial.
- Referring to Database Entries – Chapter 6 in “Frontier: The Definitive Guide” by Matt Neuberg discusses the use of database entries in various contexts.
- Addresses – Chapter 8 in “Frontier: The Definitive Guide” by Matt Neuberg discusses using and manipulating addresses in a database.
- A Genuine Dynamic Site – From Matt Neuberg’s “Dr. Matt” pages, this shows the basics of using forms and the Frontier web server, which is part of the OPML Editor.
- Web Site Framework – A list of resources on understanding how the OPML Editor renders web pages.
Series Table of Contents: