Problem: Left crank arm started moving during bike use, looked like threads were stripped. Decided to replace left crank arm and left pedal.
Tried to get a treadmill repair shop to fix this, but when they tried to get the crank arm and pedal parts, the shop said it was back-ordered for several months, no ETA.
Decided to try looking myself, SchwinnFitness.com site did not have the parts online, had to call customer service, had 20 minute wait, then ordering took 15-20 minutes (ugh!). Took two weeks for parts to arrive, started work.
Removed pedal (left pedal is reverse-threaded, read this somewhere, repair manual also mentioned it). (page 24 in repair manual)
Removed red cap on crank arm using a flathead screwdriver, sprayed some WD-40 lubricant into the shaft, then used 9/16th inch socket wrench to remove bolt holding crank arm to shaft. Discovered that I needed a crank puller tool to remove the crank arm (UGH!).
Ordered crank puller from Nautilus site (link below), could have gotten it from SchwinnFitness.com, took 2.5 weeks for part to arrive.
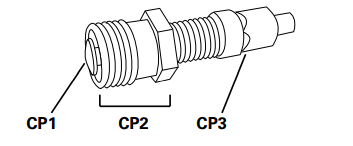
Crank puller had instructions on bag, but they were not totally clear. It turns out that the crank puller has two removable tips that are used to provide pressure on the shaft to remove the crank. The video (link above) indicates that for Schwinn indoor cycling bikes, the larger tip should be used. However, I discovered through trial and error that the smaller tip has to be used for the 270 model recumbent bike. The tips are removable (I had to use a towel/washcloth to get enough grip on the tips to remove them). The desired tip goes on the end of the crank puller that has the large threaded nut (see 0:20-0:28 in video for a good photo, also page 27 in repair manual, see picture below).

Before attempting to insert the crank puller into the crank arm shaft opening, the threaded nut (CP2) should be un-threaded such that the end of the threaded nut is at the same position as the tip (CP1). This is done to provide maximum room for the inside bolt to travel and press against the frame to remove the crank arm.
The threaded nut (CP2) should be inserted into the crank arm shaft and screwed in clockwise as far as it will go. At that point, use a wrench to tighten, then use a wrench to rotate the CP3 end of the crank puller clockwise. As the thread turns, the tip end (CP1) will press against the frame and push the crank arm off the shaft.
When putting the new crank arm on the shaft, make sure that the arm is oriented 180 degrees opposite the other crank arm (otherwise pedaling will be difficult!). The crank puller is not needed to put on the new crank arm, it should fit onto the crank. A few taps from a hammer on the crank arm will make sure that the crank arm is fully seated on the shaft. Replace the hex head bolt using the socket wrench as mentioned above, then replace the cap.
At this point, the new pedal can be put on the end of the crank arm (remember the left pedal is reverse-threaded).
Resources:
https://www.youtube.com/watch?v=sL-HnsnqcUs
Video that best shows how to use a crank (arm) puller
https://download.nautilus.com/supportdocs/AM_OM/Schwinn/SCH.230-270.MY13.SM.pdf
Schwinn 270 Recumbent Bike Service Manual (2013 models)
| tem | Quantity | Unit Price | Subtotal | Discount | Item Total | |
| 74025 TOOL, CRANK PULLER | 1 | 18.99 | 18.99 | 18.99 |
Tax: $.00
Shipping: $4.99
Order Total: $23.98
Item from Nautilus parts web site:
https://www.nautilus.com/crank-puller/74025.html#q=crank%2Bpuller&start=1
| 8003334 PEDAL ASSEMBLY, LEFT, MY13(BIG STRAP) | 1 | 4.24 | 4.24 | 4.24 | |
| 8001394 CRANK ARM LEFT | 1 | 4.83 | 4.83 | 4.83 |
Items from Schwinn web site (had to call Customer Service to order (800-556-2896), did not appear on parts web site)
https://www.schwinnfitness.com/schwinn-replacement-parts/
Parts from Schwinn 270 recumbent bike manual: (https://download.nautilus.com/supportdocs/AM_OM/Schwinn/SCH.270.MY17.AM.OM.WARR.EN.pdf)
J Pedal, Left
P Crank Arm
The internet is crazy. This info exactly what I was looking for. Thank you.